Monday 1 June 2020

Fix duplicate drives in Windows 10 File Explorer


To fix the Duplicate drives problem in Windows 10 file explorer, you simply have to remove a key from the Registry. It is as simple as that. To do this, follow the simple steps given below.

1. Press the Win+X keys simultaneously and select Run from the options.


2. After opening the Run dialog box, type regedit and press Enter. It will prompt you to confirm the action. Click Yes and the Registry Editor will be opened.


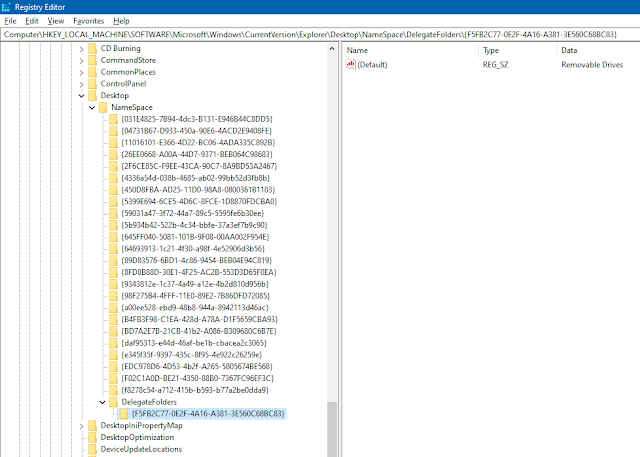
3. Now follow this path in registry keys list on the left panel and Navigate to the DelegateFolders key: HKEY_LOCAL_MACHINE\SOFTWARE\Microsoft\Windows\CurrentVersion\Explorer\Desktop\NameSpace\DelegateFolders


4. After navigating to the DelegateFolders key, there will be a sub-key named as {F5FB2C77-0E2F-4A16-A381-3E560C68BC83}


Delete the {F5FB2C77-0E2F-4A16-A381-3E560C68BC83} key by right-clicking it and selecting the Delete option. Once this key is deleted, there won’t be any duplicate drive icons in Windows 10 File Explorer.
Saturday 13 July 2019

Mark Your Internet Connection as Metered to Intercept Windows 10 Forced Updates


Configuring your internet connection to a Metered Connection will require Microsoft to ask for your permission before downloading and installing updates.

Bear in mind that this option will only delay the updates. As soon as you toggle the Metered Connection button to “OFF,” Windows 10 will start downloading updates again automatically.

But as long as the metered connection button is set to “ON,” Windows 10 will never download any update without your permission.

To set your connection as metered, follow these steps:

1. Select Start > PC Settings > Network & Internet Network Status >

2. Select Ethernet (or Wi-Fi) > Network Profile (or Advanced options) >

3. Set metered connection as off.

See screenshot below for the steps:


More information here: stop-windows10-forced-updates

Saturday 4 November 2017

Microsoft Windows 10, frivolous background Apps & Services, on by default


Microsoft Windows 10, frivolous Apps & Services that are constantly running in the background, unless you go into your Privacy Settings to specifically turn them off...


  • Alarm & Clock
  • Calendar
  • Get Office
  • Groove Music
  • Maps
  • Microsoft Edge
  • Movies & TV
  • People
  • Phone
  • Phone Companion
  • Photos
  • Skype Video
  • Store
  • Twitter
  • Weather
  • Xbox

Even more annoying is when they keep on running even after you've exited the App or application; you then have to manually go into Task Manager to 'End' or 'Kill'  the task to stop it guzzling up precious CPU %

Open Settings>Privacy>App permissions>Background apps
(
Background apps is on the left-hand-side menu.)

Under 'Let apps run in the background',  S
lide the toggle to the left to switch it setting off 

Saturday 14 October 2017

How to Fix: Winamp for Windows lowers volume after playing midi files


Change Winamp settings as follows:

In Winamp type Ctrl+P (for Preferences) navigate to > Plug-ins > Input > double click 'Nullsoft MIDI Player' > Device Tab > select from the Device: drop-down menu, then select:  "DirectMusic / Microsoft Synthesizer (with output)"

DirectMusic / Microsoft Synthesizer (with output) uses software emulation of MIDI instruments instead of using your sound card's built-in MIDI support. This effectively allows Winamp's volume control for the playback of MIDI files instead of altering the system's MIDI volume, MIDI device volume or the Winamp volume in the Windows mixer (in Windows 7 anyway - have not tested this in other Windows versions)


Change the 'Device:' to "DirectMusic / Microsoft Synthesizer (with output)":


To configure Winamp to NOT lower the volume when
(or after) you play midi files, try changing 'Volume Control:' to none:

Prefs (Ctrl+P) -> Plugins -> Input -> MIDI Player plugin -> config:

Device tab:
After changing the '
Device:' to either your sound card's hardware MIDI synth or to one of the DirectMusic software synthesizers (requires DirectX 8 or higher), then...

Volume Control:
Default = autodetect
You can change this to None
and then Winamp will never adjust the volume


Original Source: http://forums.winamp.com/showthread.php?t=320434

Wednesday 17 May 2017

Secret Way To Delete Selected History From Your Chrome Browser


No "select all" option in Google chrome history for particular items ...


If you’ve looked around, you may have noticed in Google Chrome that it’s easy to delete just one item in history search-results, or to delete absolutely everything in history. But that’s not always practical!

So here's a secret way to delete a portion of your history without blasting all of it – something not documented anywhere:


Click your Chrome menu...the 3-dot or 3-line icon near the upper right of your browser. Then click 'History' in the menu that appears - you can also use quick-access hot-key (Ctrl+H) 


menu hamburger
Click on Menu Configuration

Now you’ll see a list of recent history items in a new tab.

Choose a Group of Items to Delete

To narrow down the items displayed, do a search using the “Search History” box at the top. After you’ve settled on a group of items to delete…
  • Click the checkbox on the first item
  • Scroll to the bottom of the page
  • Press the Shift button on your keyboard and hold it down. While holding it down, click the checkbox on the last item. This is the secret trick! This is in no menu, and is not mentioned anywhere on the screen.
  • Scroll back to the top of the page, and click “Remove Selected Items”.

Source: Secret Way To Delete Selected History From Your Chrome Browser

Wednesday 22 March 2017

Playing DVD-RAM Video Disk On PC

If you're on a Windows 8 or Windows 10 Computer, you most likely find that the system, using built-in or bundled software, can automatically recognize and play DVD-RAM discs containing recordings from a TV. On a Windows 7 Computer however, try the follow if you're having trouble getting the system to play your old TV-recorded DVD-RAM discs:

Open Real Player, and click File->Open:


Navigate unto the DVD-RAM disc where there is a DVD_RTAV folder. Select the VR_MOVIE.VRO file from within this folder and Real player will recognize and then play this file as a movie.


As an alternative, if you wish, you could copy this VR_MOVIE.VRO file to your hard drive (especially comes in handy for transferring to a computer or laptop that has no DVD-drive or has a faulty DVD-drive) then add an MPEG extension to the file, for example VR_MOVIE.VRO.mpeg, and Real Player will also then recognize and play this file as a movie. No DVD-drive required!

Wednesday 4 January 2017

Google certification - How To Get Certified by Google

https://digitalgarage.withgoogle.com/certification


Get certified by Google

Kickstart your career with an impressive digital certification. Our free online courses will guide you through everything from search engines, to social media and beyond. Keep learning >> 

Why get certified?

A certification is a great way to make your CV shine. It shows you’ve got genuine digital skills, and that you are motivated to learn: two essential qualities in today’s business world.


https://digitalgarage.withgoogle.com/certification

Get the Certification

Google have partnered with the Interactive Advertising Bureau to offer a free certification for those who finish our complete course content. The content covers the basics and beyond, to help you build a great foundation of digital skills. And you can showcase this qualification on your CV and LinkedIn profile too.
https://digitalgarage.withgoogle.com/certification